
ComfyUI is a powerful and modular stable diffusion GUI and backend that is deemed to be better than Automatic1111. Also, having watched the video below, looks like Comfy the creator works at Stability.ai which means this interface will have lot more support with Stable Diffusion XL.
Why is it better?
It is better because the interface allows you chain and build a workflow of your entire process which is not possible in Automatic1111 (A1111). It looks more daunting that A1111 and more technical than what you may be used.

Installing ComfyUI
Head over the website and follow the directions. Ideally this should work but it didn’t for me which is when instead of spending hours troubleshooting I found a better way. Its making the best of both worlds: Automatic1111 and ComfyUI.
The process is quite straight forward, you navigate to the Extensions tab in Automatic1111. Assuming you have launched the WebUI by running webui-user.bat file.
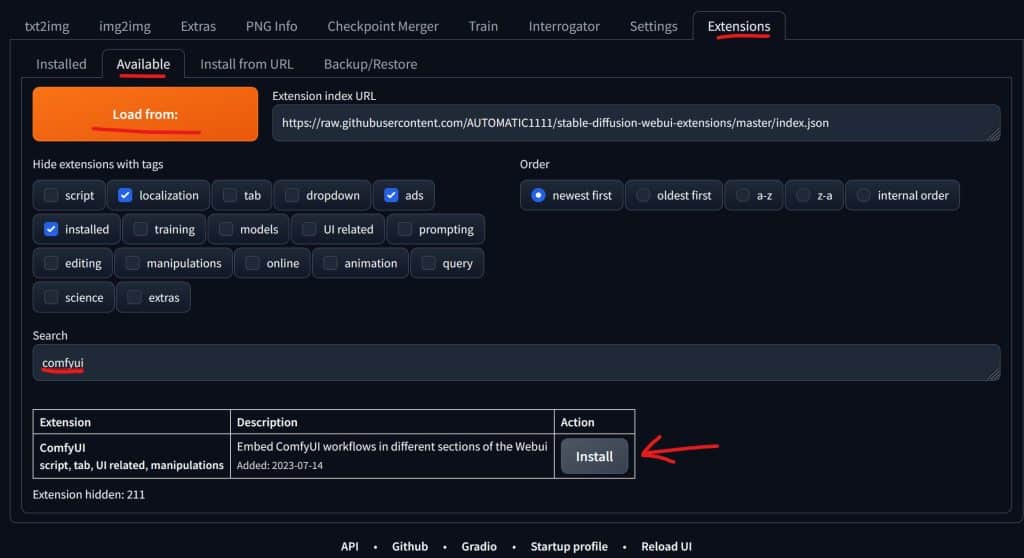
Navigate to the Extensions tab > Available tab. Click on Load from: the standard default existing url will do. Search for “comfyui” in the search box and the ComfyUI extension will appear in the list (as shown below). Click on Install.
Once installed move to the Installed tab and click on the Apply and Restart UI button

TIP: I generally re-launch webui-user.bat to start Automatic1111 again so I can be sure everything loads properly.
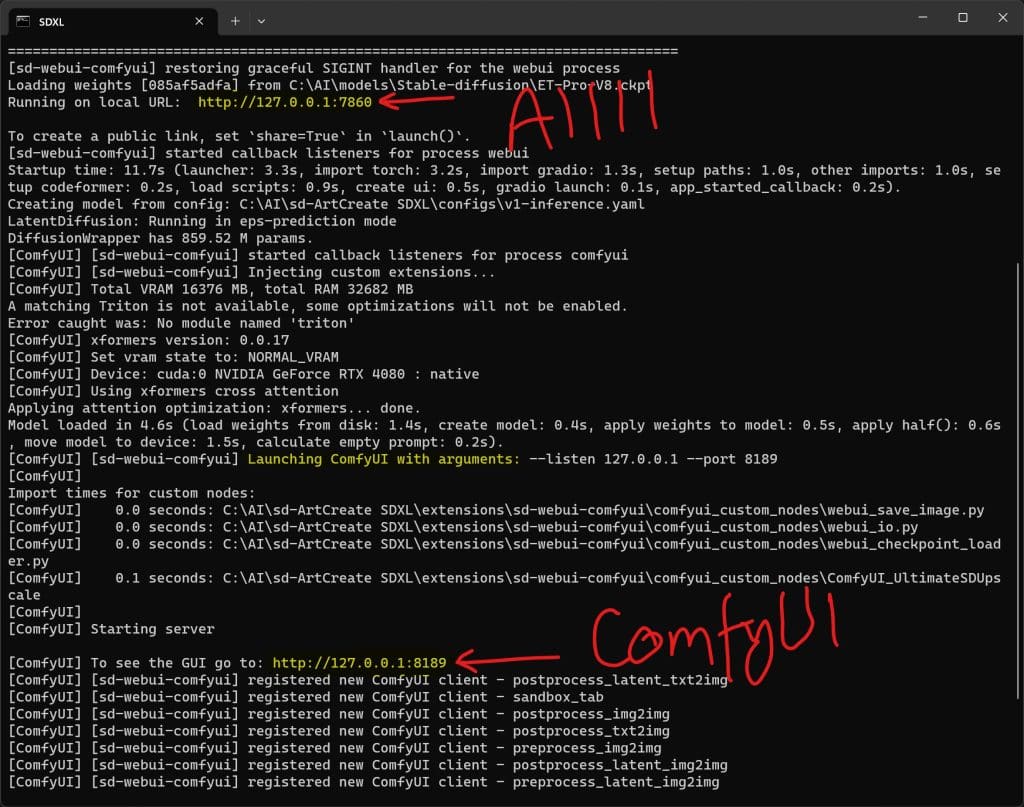
You should see the standard A1111 URL/Link created but in addition you would also see ComfyUI url as well something like http://127.0.0.1:8189 (do not click and open this link).
Only click on the Automatic1111 link to open the WebUII prefer to click on the A1111 URL which gives me access to both interfaces and UI.
Started with using ComfyUI
Now to start working in ComfyUI, you can switch to the ComfyUI tab in Automatic1111.
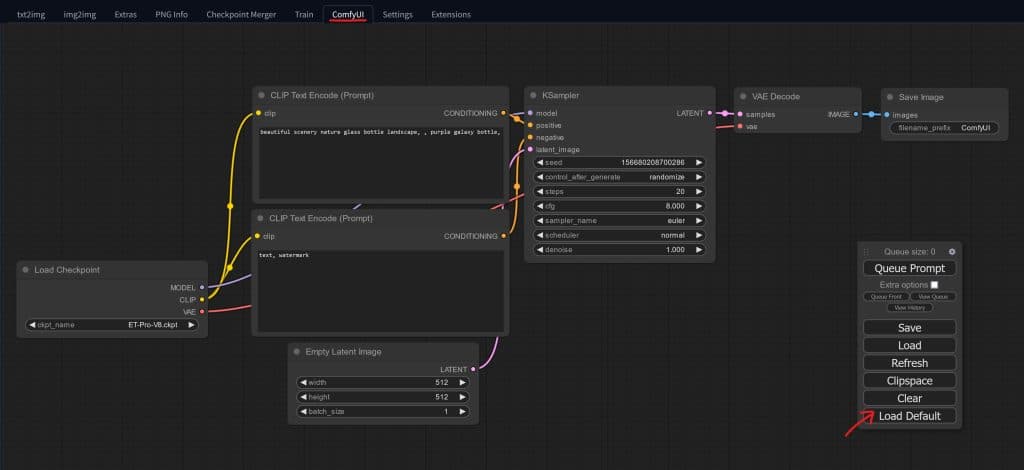
You can now start to build the workflow, but wait, you have no clue how to start building the notes and initialising the setup. But its quite easy to get started, click on the Load Default button. This will create a default workflow for Stable Diffusion 1.x model so you can start creating some images.
Quick overview of the default workflow:
- Load Checkpoint – this is where you’d select the Model you want ComfyUI to use. I’m using ET Pro V8.ckpt below.
- CLIP Text Encode (prompt) – you have two of these – one is prompt and the other is negative prompt, should not be hard to know which is which. However, if you are a complete noob, then top one is prompt (positive) and bottom is the negative prompt.
- Empty Latent Image – Here you have Dimensions and Batch size, ie. size of image to create and how many images per run.
- KSampler – this is where you select the Sampler method, Steps, Seed, CFG Scale, Denoise strength etc.
- VAE Decode – this captures the sampled data and decodes it to produce the image
- Save Image – this will save the image in SD-web-ui/extensions/sd-webui-comfy/comfyui/output directory. I have not figured out how to re-route the output to custom location, if you know how to do this please leave a comment below.
Video Tutorial
Found this wonderful and very detailed tutorial about ComfyUI which walks through the entire setup after you have installed it. This is focused on the UI itself and how to setup your own workflow, I found it very useful and learned a lot from it.
If you'd like to support our site please consider buying us a Ko-fi, grab a product or subscribe. Need a faster GPU, get access to fastest GPUs for less than $1 per hour with RunPod.io
Hello Scott,
As a new user of the DS UI I follow your tutorials attentively and with a lot of gratitude .
Actually i started right away with ComfyUI and now i feel like maybe trying to use A1111 as well. (i want to use it mostly for my concepts design in architecture).
Is it possible to link the ComfyUI models with the A1111?
Thanks
Gil
Hi Gil,
You can link them by adding paths of the various models in the webui-user.bat file. I have share how I store my models in one place so I don’t need to have multiple copies this blog post Automatic1111 tips.
Let me know if you have any more questions.
Cheers
Harmeet
Hi Harmeet
Thank you so much for your answer.
I read the post and although it is detailed i still felt a little embarrassed.
I’m not a python expert and it seems now as a necessary thing to learn.
When i first installed A111 WEBUI I had to select and check several options in the Launcher window box, one of them was were do i want my Checkpoint Folder to be stored. I guess that i hade to create, as you mentioned an AI folder and then choose it as the destination, but at this time i didn’t know what to do so i just skipped it.
I hope I’m not too much trouble, But an average user like me needs an explanation through a video clip, And I am not implying or suggesting in any way that this is what I am asking of you 🙂
Thank you very much for your help and I will continue to watch your ComfyUI tutorials.
Gil
Checkout this post. After the original post I figured out an easy way to run ComfyUI and there is a video tutorial as well.
https://weirdwonderfulai.art/tutorial/install-comfyui-in-under-5-mins/
I am given to understand that comfyUI create images faster than Automatic1111. Is that the case even when you’re running Comfy inside Automatic?? In any case I am going to give this a try. I just kind of want the over/under on whether, assuming I like using it, it will be worth setting up as a stand alone.
Yes it is faster regardless of where you run it. It’s even faster when using Sdxl in comparison to a1111 running sdxl
How do I train a lora with ComfyUI? I keep hearing people say it’s possible but I have found no instructions anywhere, just people shilling tiresome hour-long videos (“this thing in ComfyUI works almost sort of like a lora!”) and shilling pay-to-play AI image generator web pages. I want to make loras to use in Automatic1111 under Linux, because it runs 3x as fast, and because I have no real idea what to do with the bizarre and counterintuitive ComfyUI spaghetti interface other than click on “queue,” which is for some reason labeled “queue” and not “generate.”
Try Khoya_ss