
I wanted to train a LoRA style this time but as I had done before in my post Training my first SD LoRA, this time I was struggling to get it going. The issue was I for style training which was an aesthetics I wanted I had to have large data set 100+ images for SDXL LoRA I was running out of available memory getting the dreaded “CUDA out of memory” error each time I tried.
This tutorial focuses on using RunPod.io, therefore I assume you have already done three main steps of LoRA training:
- Dataset prepration
- Folder Creation using Kohya_ss
- Captioning of images using BLIP
For an in-depth tutorial on preparing the dataset etc I suggest you watch this video, it’s long but very thorough
I eventually decided to use Cloud GPU from RunPod.io which allowed me to hire a fast GPU with 24GB VRAM and train my LoRA which only took 3-4 hours in my case, as I was getting familiar with the setup process and monitoring the progress. The learning part probably cost me extra time but I think I can do it much faster next time around.
Frankly the setup is so easy I am regretting not doing this earlier. Now I have all sort of brilliant ideas for LoRAs I want to create for myself. I topped up $25 credit into my newly created account and started with my RunPod.
Deployment
Look for the Stable Diffusion Kohya_ss ComfyUI under Templates > Community section. You can also access the Template directly via this link.

Once you deployed your RunPod and its up and running you can open the panel up to see what’s kind of utilization you have when its running.

Click on Connect to start running your instance and connect to the Kohya_ss instance, this is the Service port 3010, 3000 is SD Web UI, 3020 is ComfyUI and 8888 is Jupyter but for the training purpose we need Kohya_ss and Jupyter (for uploading the images and retrieving the created model files)

Launch Jupyter Lab
Via the RunPod interface click on Connect to HTTP Service (port 8888) which will open up Jupyter Lab which gives you access to its File Browser and Terminal. You would be prompted for password when you first launch the password is provided in the readme of the RunPod and is always Jup1t3R! so you won’t have to stress about that.

Upload you dataset folder containing the main folder eg. “octanerender” and its three sub-folders: img, log, model
I just put them in the workspace folder so I can easily map them to my config file, as you can see above.
Launch Kohya_SS
Launch Kohya_ss via Connect to HTTP Service (port 3010). Switch over the LoRA tab in Kohya_SS and you can start to setup your configuration file. I have shared mine that I used which you can edit to get started with any Style training. You need to modify some basic paths to match.
SDXL LoRA Config JSON (15930 downloads )A tip that with the latest version of RunPod that I used SDXL Base 1.0 is already downloaded onto your RunPod so you can get started with using it. The path would be /workspace/stable-diffusion-webui/models/Stable-diffusion/sd_xl_base_1.0.safetensors
This will save Kohya_ss from having to download the model, you can select the Model Quick Pick to “custom” and point to this location. I suggest you verify that this file exists when you launch the Jupyter interface.
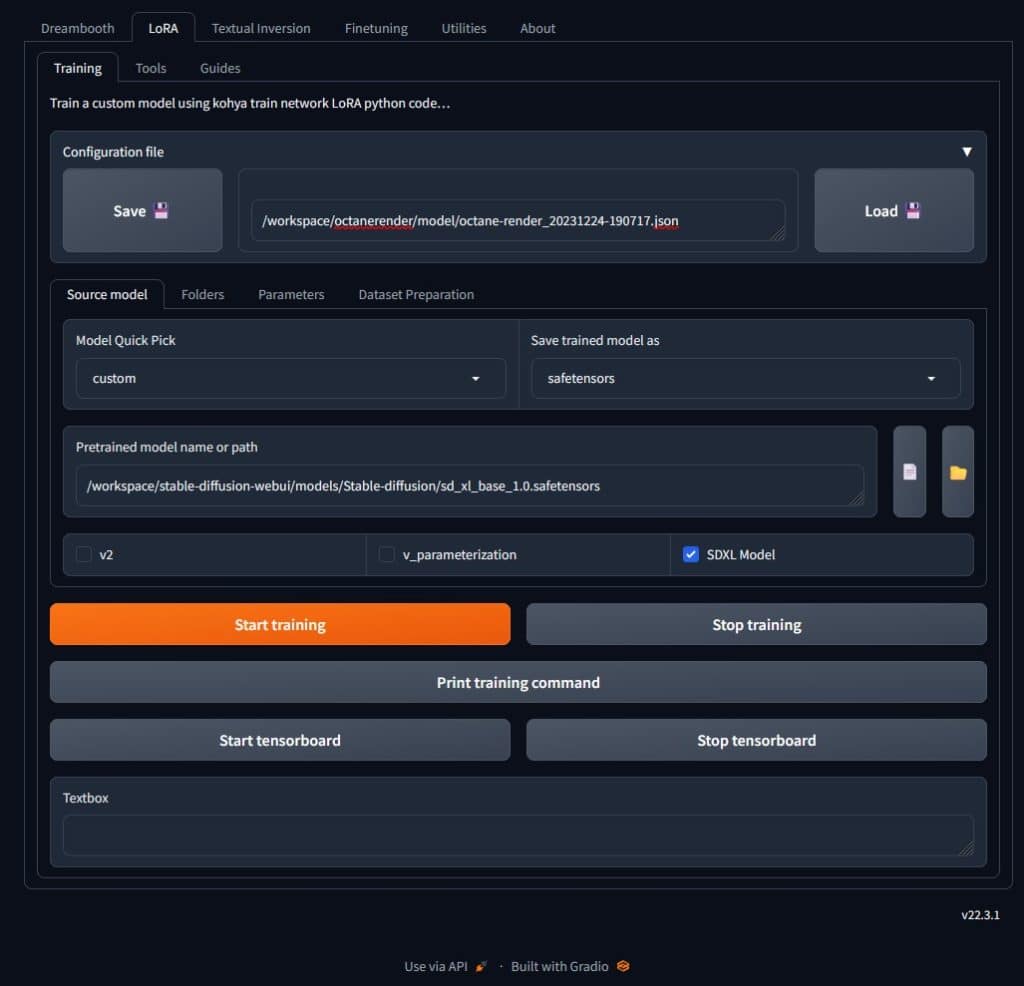
Once you are all ready to go, click on Start training. Nothing will change on the screen but you should assume that GPU utilization is jumping to 100% back on the RunPod page.
However there is one way to monitor if you know a bit of Linux. Even if you don’t well I’m going to help you out.
Simply open a Terminal window via Jupyter Lab and in this terminal window type: tail -f logs/kohya_ss.log
When Kohya_ss is running its writing all the outputs to this log file and the tail command shows you last few lines of this log file, -f makes it run continuously so you will now be able to monitor what’s happening and which checkpoint is reached, steps etc.

As the model files are generated you will see them in model folder of you style eg. /workspace/octanerender/models folder.

Download these or move them into your SD WebUI folder /models/Lora and use them in Automatic1111 or ComfyUI as you would normally.
Conclusion
Using this hosted GPU, I am now able to get past the GPU limit of my own hardware when it comes to training own models. I have no issues with generating and upscaling images using my own system but have RunPod.io being available means that I can easily use a GPU for about 3-4 hours which can cost be $4-5 approximately and now able to generate the LoRA I want for SDXL.
If you'd like to support our site please consider buying us a Ko-fi, grab a product or subscribe. Need a faster GPU, get access to fastest GPUs for less than $1 per hour with RunPod.io
Trackbacks/Pingbacks